Can’t open device "\\.\COM4": Access is denied error when uploading a sketch from Arduino IDE

I’m sure that everyone who has ever tried to upload a sketch from the Arduino IDE has seen this error message:

avrdude: ser_open(): can't open device "\\.\COM4": Access is denied.

The number of the serial port can be different, but the error is the same.

Basically (in simplified form) this error means that the USB port is in use by another application in your computer, so the Arduino IDE cannot use it to upload your sketch. It is important to understand that this error has nothing to do with Arduino, the access to the serial ports are controlled by the operating system.

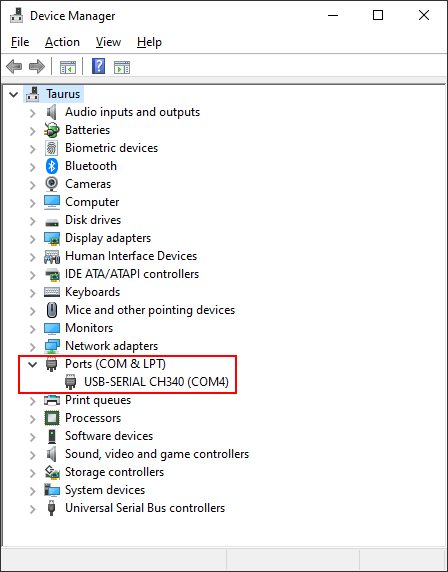
Tip #1: Check your port in Device Manager

Open Device Manager and check that your IoT device appears in the Ports (COM & LPT) section. Note the number of the port (in my case COM4):

arduino-serial-port-in-device-manager

Tip #2: Check your port in the Arduino IDE

Open Arduino IDE and check in the Tools –> Port menu that you are trying to upload to the port you have seen in the Device Manager. The Arduino IDE is quite good to detect connected devices, but in case you have multiple devices connected at the same time this is definitely worth to check:

arduino-port-selection

Tip #3: Close other programs

Try to close any programs that may use this port. Unfortunately I’m not aware of any tools that could list which app is locking a particular port (if you do, please share in the comments), so you have to think. Basically any app can be the culprit that communicates with devices, and unfortunately not only apps, but device drivers also. For example some Bluetooth drivers are reported to lock COM ports even before a device is connected.

In my experience the following apps are often causing this problem:

  • Code editors: Do you have other open Arduino IDEs, Visual Studio Code instances or apps that you use to create and upload your code open?
  • Terminal monitors: Do you have a terminal monitor connected? Sometimes they are separate apps (like Termite) or built into code editors (like in Arduino IDE or in Visual Studio Code).
  • Apps and drivers for other devices: Do you have other devices connected to your computer via USB or Bluetooth, e.g. a printer, a vinyl cutter or a 3D printer?

Tip #4: Rename the port

If none of the above works you can rename the port, and most of the time this is what fixes the issue for me.

1. Open Device Manager and navigate to the Ports (COM & LPT) section (see the screenshot above).

2. Right click your COM port and select Properties.

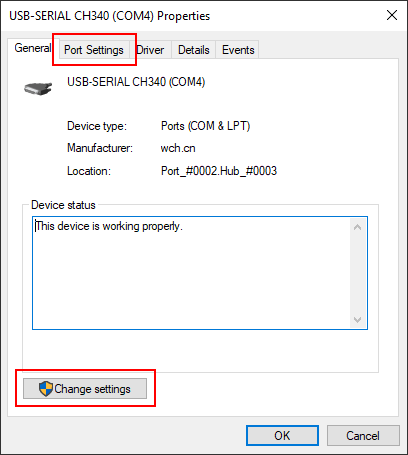
3. In the  Properties window first click Change settings to switch to administrator mode, then navigate to the Port Settings tab:

arduino-port-properties

4. In the Port Settings tab click the Advanced button:

arduino-port-settings

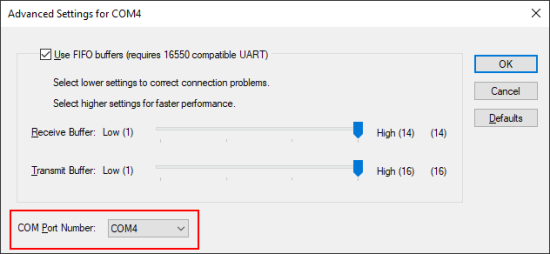
5. In the Advanced Settings window select a new COM Port Number:

arduino-port-advanced-settings

Click OK and close all Device Manager windows. Windows may ask you to restart your computer, but in my experience the Arduino IDE is quite smart to detect port changes immediately.


Did this help you? What other tricks do you have when uploading a sketch fails?

Programmer Is Not Responding error when uploading a sketch from Arduino IDE

I recently ordered an Arduino Nano and when I tried to upload a sketch from the Arduino IDE I received the following error:

avrdude: stk500_recv(): programmer is not responding
avrdude: stk500_getsync() attempt 1 of 10: not in sync: resp=0x9f

avrdude: stk500_recv(): programmer is not responding
avrdude: stk500_getsync() attempt 2 of 10: not in sync: resp=0x9f

...

avrdude: ser_send(): write error: sorry no info avail
Problem uploading to board. See http://www.arduino.cc/en/Guide/Troubleshooting#upload for suggestions.

Unfortunately the recommended page did not help. Although there are forum posts about devices that were delivered without a booloader, I definitely did not want to mess with burning it. The loop-back test seemed to be a good idea, but in the end it turned out that the solution is very simple: selecting the ATmega328P (Old Bootloader) from the Tools –> Processor menu fixed the problem:

arduino-nano-programmer-is-not-responding-not-in-sync-fix

If this does not fix the problem for you, I recommend checking this instructable for more tips: https://www.instructables.com/A-solution-to-avrdude-stk500getsync-not-in-syn/

Surviving on Mac – Tips for Windows Users: Part 4 – Finder

In previous parts of the series we’ve discussed shortcuts, applications and windows, in this episode I’m going to give you some tips about Finder, the file manager on Mac, and others.

Closing Finder

This will be short: don’t even try, it is not possible to close Finder 🙂

Navigating to the parent folder

To navigate to the parent of the current folder right-click the name of the current folder in the title of the window. A small menu will be displayed that lists all the parent folders.

mac-finder-parent

Showing extensions

To customize Finder click the Preferences… menu item in the Finder menu, then navigate to the Advanced tab in the Finder Preferences window. To make the extensions visible enable the Show all filename extensions option.

mac-finder-preferences

You can find many other useful settings in the Finder Preferences window, for example on the General tab you can define which folder will be open by default when you launch Finder.

Showing the breadcrumb

The breadcrumb is called Path Bar in Finder, and you can enable it in the View menu, with the Enable Path Bar menu item (Alt+Command+P).

The Path Bar is displayed on the bottom of the Finder window, and you have to double-click onto the folder names to navigate to the desired folder.

mac-finder-breadcrumb

Showing the status bar

The status bar can show very useful information, for example the number of files selected and the available free disk space. To enable it open the View menu, and click the Show Status Bar (Command+/) menu item.

Showing hidden files

Finder by default does not display hidden files, so any file that has a name starting with the dot character is not listed. To list the hidden files in the current Finder window you can press the Command+Shift+. (dot) shortcut, or you can use the following command in Terminal to always list the hidden files in Finder:

defaults write com.apple.finder AppleShowAllFiles YES

Connecting to a Windows network share

To connect to a Windows network share open the Go menu and click the Connect to Server… menu item. In the Connect to Server dialog enter the path to the network share in this format: smb://servername/foldername

Midnight Commander in English

If you prefer Midnight Commander over Finder and use Mac with non-English regional settings you may be surprised that MC will display in your preferred language. Add the following line to your ~/.bashrc file to force English UI in Midnight Commander:

alias mc=’LANG=en_EN.UTF-8 mc’

Jumping to a folder in the Terminal

To jump to a folder in the Terminal without typing its full path you can use Z (https://github.com/rupa/z). It learns your most frequently used folders and you can navigate to them just typing a part of their names. For installation and usage follow the steps in the README.


To be continued…

Surviving on Mac – Tips for Windows Users: Part 3 – Windows

After learning the basic shortcuts and how to start, install and uninstall applications, in this part of the series I’m going to give you some tips about managing the application windows on Mac.

Finding an application window

There are several ways to switch back to an application window you were using earlier:

  • Use Command+Tab to navigate between the running apps.
  • Swipe up with 3 fingers to go to Mission Control that shows all non-minimized windows on the current desktop.
  • Swipe with 3 fingers to left or right to switch between desktops.
  • Look for your window on the right side of the Dock.
  • Look for your app among the status icons at the top of your screen.

Grouping windows

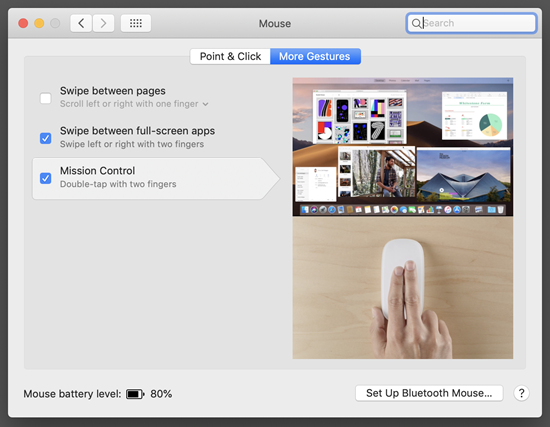
By swiping up on the touch pad with 3 fingers you can start Mission Control which shows all your windows. To get to Mission Control using your mouse go to System Preferences, select Mouse applet and enable Mission Control on the More Gestures tab.

mac-mouse-gestures

You can force grouping of the multiple windows of the same application by enabling the Group windows by application option in the System Preferences, Mission Control dialog.

mac-mission-control-preferences

Moving the Dock

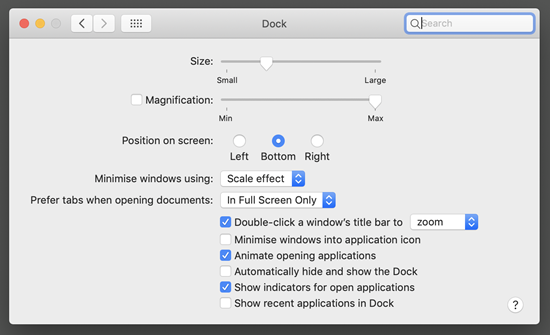
You can customize the position of the Dock by clicking the Apple menu, then the System Preferences… menu item and selecting the Dock applet.

mac-dock-config

To move the Dock between multiple monitors just move your mouse to the bottom of the desired screen and wait a few seconds – the Dock will jump to that screen.

Maximizing a window

You can maximize a window by double-clicking its title bar. On Mac this is called “zoom”. The window will resize itself to use as much space as possible on your desktop without hiding the Dock or the menu bar at the top of the screen. (This trick may not work with or may work differently with applications that customize their window frame, like Slack or Microsoft Word.)

You can also maximize a window by clicking the Green dot on the left of its title bar. This will resize the window to use your full display. Because in this mode both the Dock and the menu bar is hidden, this mode is useful if you are focusing on one application. Or you can maximize multiple apps on multiple displays, and switch between them with the 3-finger left-right swipe gesture.

When you switch between apps using the Command+Tab shortcut maximized windows are sliding left and right, normal windows are just moved to the foreground.

Returning from full screen

To restore a window that you maximized before with the green dot to non-full screen just move your mouse to the top of the window and wait until the menu bar and the window frame slides in from the top. Click the green dot again to scale the window back to normal size.

Minimizing a window, so you can find it later

Minimizing a window is easy: just click the Yellow dot in the application window frame or press the Command+M shortcut. But finding it to restore it can be tricky!

By default applications are minimizing itself to their launch icon on the Dock, so to restore their window just click on their icon on the Dock again.

However, by turning off the Minimise windows into application icon option among the Dock options within the System Preferences you can force the windows to minimize themselves to the right side of the Dock.

Closing a window

You can use the Command+W shortcut to close the current window or tab.

Moving windows between displays

At the moment there are no built-in shortcut to move a window to another monitor, but thankfully there are tons of applications that can do this, and even more. I use Spectacle, it is free and minimal.

spectacle


To be continued…

Surviving on Mac – Tips for Windows Users: Part 2 – Applications

In this second part of the series, I’m going to give you some tips to manage your applications on your Mac.

Starting apps from Dock

Dock is the name of the giant icon bar at the bottom of the screen. To start an application just click on its icon.
To configure the Dock click the Apple logo on the top left corner, then click the System Preferences… menu item, and select Dock from the System Preferences dialog.

mac-dock-config

Starting apps with Spotlight

You can start applications or search for basically anything by using Spotlight. Press Command+Space and start typing the name of the application.

mac-spotlight

Installing applications

Mac applications are usually distributed as .dmg files without any install wizard. To install the app, double-click the .dmg file. Most apps display a dialog that asks you to drag the application’s icon and drop it to the Applications folder. That’s it.
Installed applications automatically appear in the Launchpad, the full screen application launcher that you can access by clicking the rocket icon on the Dock.

mac-install-app

Uninstall an app

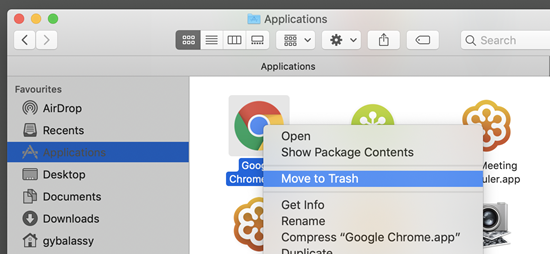
To uninstall an app go to the Applications folder, right click the app’s icon and click Move to Trash.

mac-uninstall-app

Quit from an app

When you click the Red dot on the title bar of an app it is not closed, only minimized to the right side of the Dock. To quit from an app click on its name on the menu bar and click the Quit <appname> menu item, or use the Command+Q shortcut. Note that you cannot quit from Finder.

mac-quit-from-app

Switch between apps

You can use the Command+Tab shortcut to navigate between the running apps. Note that the popup dialog displays every application only once, even if it is running in multiple instance or in multiple windows. When you select an app its window will not be restored if you previously minimized it to the Dock.

Close a window of an app

There are apps that are using multiple windows or tabs. In most apps you can use the Command+W shortcut to close the tabs or windows.

Installing apps from the command line

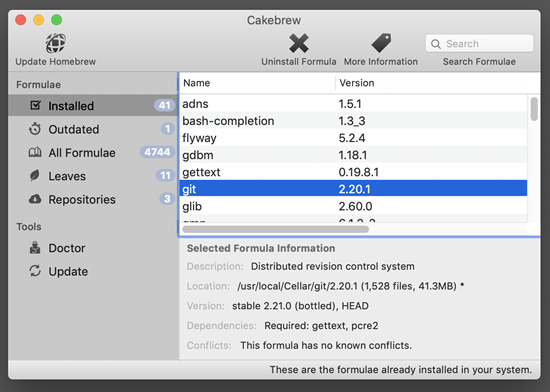
Homebrew is the most widely used command line tool on Mac to install applications. If you don’t want to learn the numerous command line switches, you can use Cakebrew, which is a simple UI for Homebrew.

mac-cakebrew


To be continued…

Surviving on Mac – Tips for Windows Users: Part 1 – Shortcuts

So you have to work on a Mac after being a Windows user in your whole life and you can’t find anything and everything looks so unlogical? In these series I’ve collected few tips that saved my life. In this first part, let’s talk about shortcuts.

Clipboard shortcuts

The clipboard shortcuts on MacOS are triggered with the Command key, instead of Control, otherwise they are the same:

Copy: Command+C

Cut: Command+X

Paste: Command+V

Shortcut cheat sheet

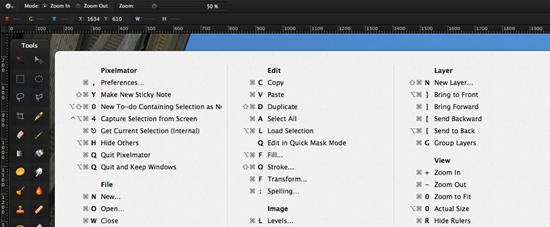
Media Atelier created a CheatSheet application that displays the available shortcuts for the current app in a popup window if you press the Command button for a few seconds:

CheatSheet-app

It is very handy to learn new hotkeys.

Taking a screenshot

There is no Print Screen button on a Mac keyboard, but you have several shortcuts to take a screenshot in different ways:

Take screenshot: Shift+Command+5

Save screenshot: Shift+Command+3

Copy screenshot: Control+Shift+Command+3

Save screenshot (selection): Shift+Command+4

Copy screenshot (selection): Copy+Shift+Command+4

Unless you are a pianist, these are not short at all, so let’s call them hotkeys instead 😉

Locking the screen from the Touch bar

Click on the Apple logo on the top left to get to the system menu, and there you can see that the hotkey for locking the screen is Control+Command+Q, and for log out is Shift+Command+Q.

Mac-lock-screen-hotkey

If your Mac has a Touch Bar, you can add the Lock button to it, so it will always be at your fingertip, and minimize the risk that you will press the log out combo instead.

Mac-keyboard-settings

Click the Apple logo on the top left corner, then click System Preferences.

In the System Preferences dialog click Keyboard, then click the Customize Touch Bar button at the bottom.

Select the Screen Lock icon and drag it to the bottom of your screen, like you were physically moving it out from the display to the Touch Bar.

Using the same technique you can also add the Screenshot button to your Touch Bar.


To be continued…

Fixing a restart/reset/reboot loop on ESP8266

Did you ever manage to render your ESP8266 to an infinite reset boot loop? I did! Not intentionally of course, but it happened: after loading a sketch with version 2.5.0-beta2 of the ESP8266 core for Arduino to the chip, the magical autoConnect method of the otherwise fantastic WiFiManager library started to threw an exception and triggered an instant reset of the device. (Why did I experiment with a beta? I desperately wanted HTTPS the easy way.) Unfortunately I called this method from the setup function, so the restart happened so quickly that I did not have a chance to load a fixed code onto the device.

Starting in Flash Mode

To successfully load a new code to the device I had to prevent the start of the currently loaded code when the device boots. Under normal circumstances the device starts in Boot Mode, but by pulling the GPIO0 pin to LOW, you can switch it to Flash Mode, which allows loading new code to it. If you are like me you have probably never did it before, because if you have a NodeMCU DevKit, the USB connection does that automatically while flashing (source). This is how I did it on my NodeMCU DevKit v0.9 with a single cable:

esp8266-reset-loop-flash-mode

Delete everything

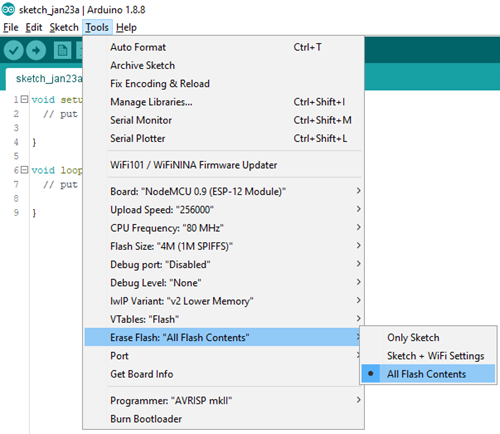
The next step is to delete everything you previously loaded or saved to the device. The Arduino IDE by default erases only the sketch, but in the Tools –> Erase Flash  menu you can force it to erase All Flash Contents:

arduino-ide-erase-all-flash-contents

A good idea is to load a simple sketch, like Blink to your device with this setting, or one that calls the resetSettings function of the WiFiManager.

Additional tools

The following tools can be also useful:

  • Erase Flash sketch by Ken Taylor: A short Arduino sketch to erase all of the flash memory in an ESP8266 device. This is useful for fixing corrupted memory.
  • Esptool by Christian Klippel: A tool to create firmware files for the ESP8266 chip and flash the firmware to the chip over serial port.
  • ESPlorer by 4refr0nt: An Integrated Development Environment (IDE) for ESP8266 developers, mainly useful for NodeMCU developers even to fix PANIC errors.
  • Flash Download Tools by Espressif: The official flashing tool set to completely format or ease the flash memory.
  • Termite by CompuPhase: A simple RS232 terminal to catch error messages like rst cause (official PDF) and boot mode.

Delete old document versions from OneDrive for Business

I’m using OneDrive included in my Office 365 subscription to store a copy of my local backup in the cloud. My subscription provides 1 TB cloud storage for every user, which is quite a decent amount of storage space, at least for my needs, so I was really surprised when I received the warning that my OneDrive is full. How can that happen, my backup data is only 0.5 TB locally, how can that consume twice as much space in OneDrive?

What takes up so much storage space?

I sync tons of data to OneDrive, so first I had to understand what actually consumes the most storage space. OneDrive by default does not show the size of folders, but here is the trick to view that:

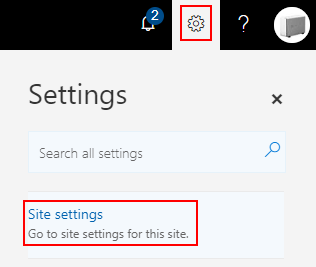
Click the Gear on the top right corner, than click Site settings on the sidebar:
Site-Settings-menu

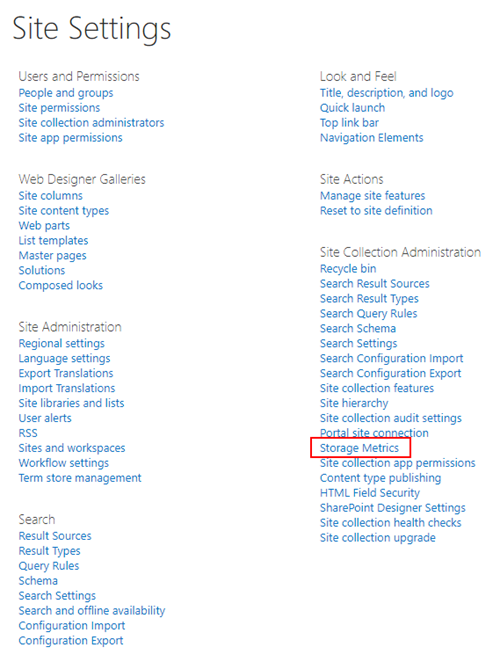
If you ever administered SharePoint, the list of menu items will be familiar to you: your OneDrive for Business storage is actually a SharePoint site collection. Click Storage Metrics in the right column:
Site-Settings

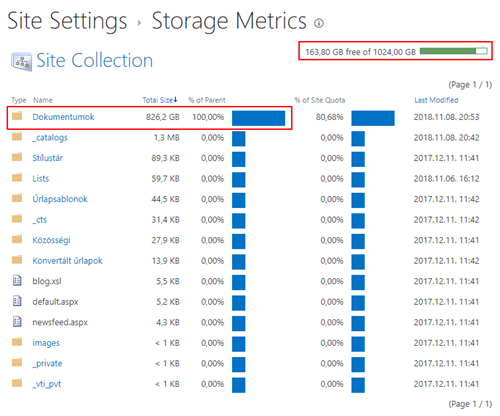
Here you can see all your files and even the system folders with a nice inline bar, so you can immediately see which folder consumes the most space. Actually all your data is in the Documents folder:
Storage-Metrics

By clicking the folder names you can dive deeper and see subfolders and files. Note that the Total Size includes the following:

  • Deleted files in Recycle Bin
  • All versions of the file
  • Metadata associated with the file

To check the versions you can click the Version History link on file level:

File-List

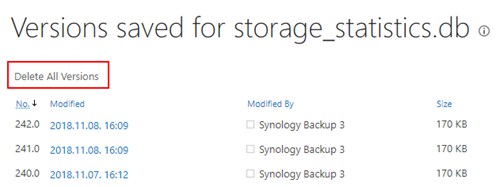
Here you can see that OneDrive for Business does have file versioning enabled by default, so when you overwrite a file, the previous version remains there and consumes storage space from your quota. By clicking the Delete All Versions link you can get rid of the old versions:
Delete-All-Versions

Unfortunately you have to do it file-by-file, there is no UI option to delete the old versions of all files from your subscription.

Recycle Bin

As a first step I wanted to check whether my Recycle Bin contains any files, because if it does, it counts into my quota.

So I opened my OneDrive in the browser and clicked Recycle bin in the left menu:
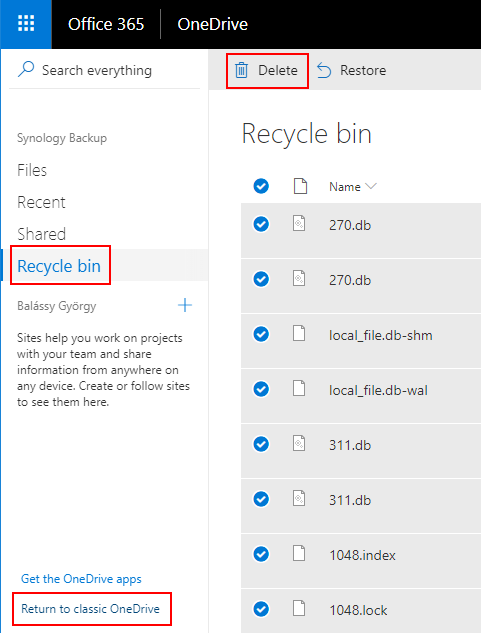
OneDrive-Recycle-Bin

Unfortunately it does not show how big are those files in the Recycle Bin, but clicking Return to classic OneDrive in the bottom left corner you can get a different view, where you can sort the file by Size, and Empty the Recycle Bin with a single click:

Recycle-Bin-file-size-list


Do you think you are done? Not yet! Recycle bin is there to protect you from accidental file deletion, but there is a second-stage recycle bin to protect you against accidental recycle bin emptying:
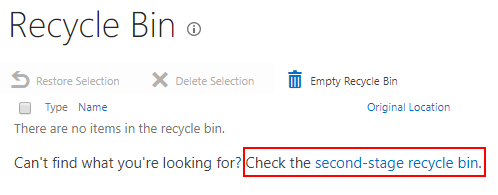
Recycle-Bin-empty

So click the second-stage recycle bin link (which is actually the admin level recycle bin on the site collection) to see that your files are still there:
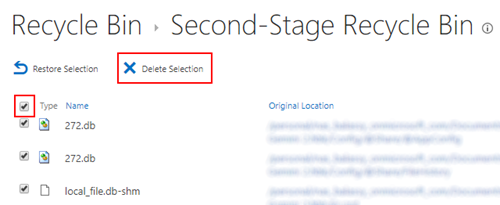
Second-Stage-Recycle-Bin

Click the checkbox at the top of the first column to select all files, then click Delete Selection. Bad news: the list is paged, and you have to do it page by page 😦

Disabling document versioning in OneDrive for Business

Because your OneDrive for Business is actually a SharePoint site collection, and all your files are in the Documents folder which is actually a SharePoint document library, you can disable versioning for all your documents by disabling versioning in that single document library. To find that configuration option first click Return to classic OneDrive in the bottom left corner, then the Gear on the top right corner, and then click Ribbon in the right sidebar to view the ribbon:
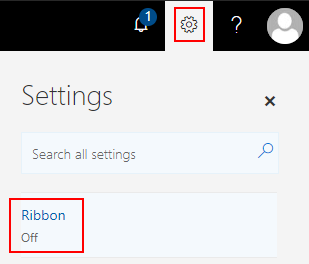
Enable-Ribbon

Expand the ribbon by clicking the Library tab, and then click Library Settings towards the right end of the ribbon:

RIbbon

The settings page of the document library contains several useful option and information:
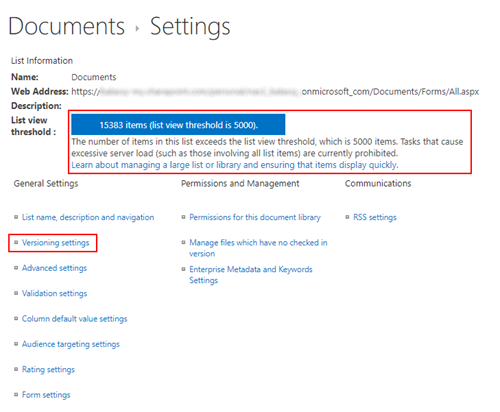
Documents-Settings

First, if you have more than 5000 files in your OneDrive (like I do), a List view threshold warning is shown on this page. This will be important later, because as the description says, you cannot do operations on that many files at once.

Second, the Versioning settings link leads to the page where you can disable versioning, or limit the number of versions retained:
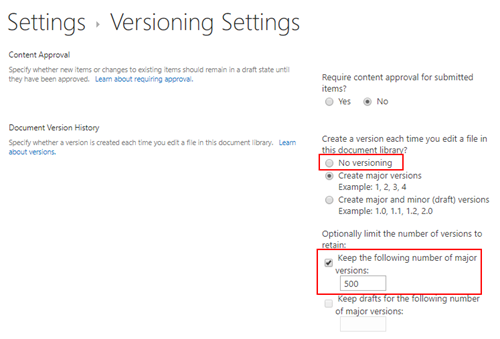
Versioining-Settings

Both option can help you reduce the storage space needed for your files. Note however that turning off versioning here does not delete the existing versions of your files!

Delete old document versions of all files

Unfortunately there is no option on the UI to delete the old versions of all your documents with a single click, but thankfully SharePoint has an API, so you can do it programmatically.

If you have multifactor authentication enabled (you do, right?) then the first step is to generate an application password. To do that click your avatar in the upper right corner, then click the My account link, or navigate directly to https://portal.office.com/account/.

On the left menu click Security & privacy, then on the middle pane click Additional security verification. It does not look like a menu item, but it actually is, and expands the pane to show new items:
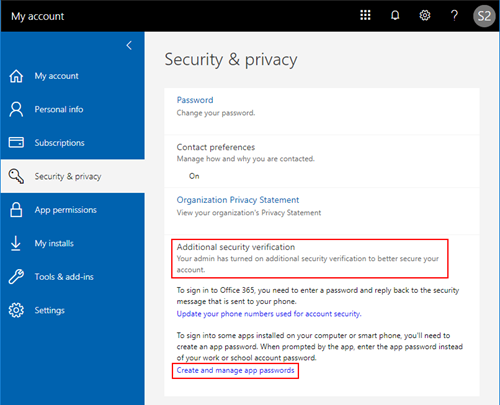
Security-and-privacy

Click the Create and manage app passwords link and use that page to generate a unique password for your app.

The next step is to download the SharePoint Online SDK which installs a set of DLLs into the C:\Program Files\Common Files\microsoft shared\Web Server Extensions\16\ISAPI folder. You can use these DLLs with the PowerShell scripts published by Arleta Wanat to the TechNet Script Center:

These are very handy scripts, note however that they have a limitation: they cannot deal with more than 5000 files and you can receive the following exception:

“Microsoft.SharePoint.Client.ServerException: The attempted operation is prohibited because it exceeds the list view threshold enforced by the administrator.”

Thankfully CAML has the power to limit the number of returned items using RowLimit and add paging, however it does not always work if you want to run a recursive query. But the option to run a separate CAML query to each and every folder is working.

I implemented my final solution in a good old .NET console application using the SharePoint client-side object model. The application executes the following steps:

  1. Connects to your OneDrive for Business or SharePoint site collection.
  2. Finds the Documents document library.
  3. Iterates through the specified subfolder paths in the document library.
  4. It runs CAML queries in every folder to retrieve the documents (files). In a single query maximum 100 documents are retrieved, and the query is executed again and again until all documents are processed.
  5. If a document has multiple versions, they are deleted.

You can find the code in Github and customize it according to your needs: https://github.com/balassy/OneDriveVersionCleaner
 

Technorati-címkék: ,,,

Show me your imports, and I’ll tell who you are

Well, maybe not, but your imports may indicate, how maintainable is your code.

Have you ever written something like this:

import { SomeClass } from 'somelib';
...
const s = new SomeClass();

Or this:

import * as someFunc from 'somelib';
...
const s = someFunc();

Looks familiar, right? I’ve written a lot of lines like these, mainly because the README in every library, package recommends them. But there are (at least) two problems with this code why I am trying to avoid them.

Dependency management

If you unscrupulously follow this pattern, you will write the same line of code hundred (or more) times within a single application. Why? Because we love copy-paste. Easy, convenient, and it works, right?

However in this way it will be very difficult to determine what your app exactly needs, what it depends on, what are its dependencies. What one can easily see from your code (only after using the “Find in All Files” feature of your favorite editor), is that your code references to an external package in countless places, so it needs that package, your app depends on it.  

But reality is different: your application logic does not need a package, but a functionality, a logic, which happens to be implemented in a third party package. But it’s not what your code shows at the first sight.

Here’s a more specific example with the popular lodash package (*):

var _ = require('lodash');

This package provides a number of utility functions, and it is pretty much impossible, that your app needs all of them. How can you find out what exactly you are using? Search all your files for “_”.

But why is that interesting?

For example, because you may want to replace the referenced package with something else. In the open source world, packages come and go, today this was the best, tomorrow that will be the one. Because the old package contains a bug, that will never be fixed, or because only the new package is compatible with the latest Node version that other parts of your app requires. Or simply because you want to keep your codebase fresh, and you want to use only dependencies with active community.

You can be sure that you will not find another library or package, that is API-compatible with the old one. You need one that is compatible on functionality level, which you can only find out if you know exactly what functionality are you referring to.

When you have that, you just have to change the references in as few places as possible in your code.

This leads to the solution: make sure, that you reference third party packages only once in your code, so wrap them into classes that publish only the functionalities your app depends on. This method can also make your code more readable, for example, instead of "sha256()", you can find a much better function name, right?

This method works for me very well for a long time, though I have to note I don’t follow it fanatically, because it will be too much overhead for framework level libs (e.g. Angular).

Testability

If your class uses “import” to refer to another one, unit testing that class will be a nightmare, because you will have to hack the file loader logic to mock the class (e.g. Mocking Request-Promise).

The solution is not new: DI. Not only does it make testing easier, but typically you just have to take a look at the constructor, and you will see on what other classes this one depends on.

For example, in TypeScript, we often import interfaces just to have type description, which can make import rows very verbose, and often you cannot determine at the quick glance which import brings in functionality and which one is there for type information only. DI also helps in this, if we try to use “import” only for type descriptions, and DI for everything else.

Is this something new?

Not at all. Really. Yet these codes continue to live, even if they are hard to maintain. READMEs, tutorials, articles, blogs will always strive for simplicity, you will find examples of them that help you understand the content and get started. Their purpose is not to blindly follow them in a more complex application where maintenance and sustainability is as important as simplicity. When you write such a line next time, think about what you’re really bringing into your codebase. Do you really gain some time with it on the long run?

programming-is-thinking_thumb


*: The example is not perfect, because lodash provides more fine grained imports, however it is not well known or widely used.


Technorati-címkék: ,,

Printing five-dimensional objects with a 3D printer

On this day exactly five years ago, the Volume 49, Issue 1 of the British Journal of Psychology was made available online, in which Lionel Penrose and his son, Roger Penrose published an article titled Impossible Objects, about objects that physically cannot exist. Probably the most well-known among those objects is the Penrose-triangle:

5d-penrose-triangle_thumb[1]

The original article was published much earlier, in 1958, and in the 50 years that passed since then, we learned a lot about our world. With our current knowledge we can confidently say, that the Penroses were wrong, these objects can exist, and we can create them using the modern 3D printing technology.

As a first step, we need a model we will print. The first problem is that traditional graphic and modeling softwares can work only with three dimensions, and to print these objects, you will need more. So you can forget SketchUP, Blender, AutoCAD, Maya, Tinkercad etc., because they understand only the 3D world.

The only possible option (at least I’m not aware of any other) is to describe your model in code, instead of drawing it. OpenSCAD is a wonderful tool for it! Even if you have only a little affinity to programming, I absolutely recommend you to use OpenSCAD to define your 3D models. Because we are working with code here, we are not limited by the three-dimensional space, and we can use transformations to move our objects to additional dimensions. The most important is the to5d() method here, that you can find in the Transformations group in the OpenSCAD CheatSheet:

5d-openscad_thumb[1]

After we have the model, the next step is slicing it. I mostly use Cura to slice my STL files, because its UI is very intuitive, and not too crowded with controls. Probably this is the reason why many controls are available only through the Expert config dialog:

5d-cura-expert-config_thumb[1]

Unfortunately you cannot find five-dimensional printing options even here by default, but if you look thoroughly, you can notice that while most labels are nicely vertically distributed, the labels in the Black Magic group are nearly touching each other. This is because if you enable both options there, a third one, called Enable more dimensions is displayed in that narrow space. Let’s enable that too:

5d-cura-black-magic-settings_thumb

With that option enabled, Cura can seamlessly open the 5D STL file created by OpenSCAD, and we can print it as usual. This is my printed Penrose-triangle:

5d-triangle_thumb[1]

Another photo with a classic 3D object:

5d-triangle-with-pencil_thumb[1]

I made these photos with my phone without flash, and the curvy edges of the objects are the result of the limited capabilities of my entry-level printer.

After I successfully printed my first “impossible” object, I wanted to print the triangle of the Swedish graphic artist, Oscar Reutersvärd (source: Wikipedia):

5d-reutersvard-triangle_thumb

The OpenSCAD model is much simpler here, I only had to create 9 cubes. After that I could open the model in Cura:

5d-cura-preview_thumb[1]

You can see a lighter region on the preview image at the second cube on the right from the bottom. To be honest I cannot explain what caused it, but thankfully it is just an error in rendering, I could successfully print this too. This is the result:

5d-cubes_thumb[1]

When we are talking about impossible objects, we can not talk about M.C. Escher’s famous picture with the endless staircase. This is how it looks in Cura:

5d-cura-stairs_thumb[1]

After my printer completes the print, I will upload the photo here.

As you can see from these examples, 3D printers can be used to print more than three-dimensional objects, so don’t get stuck into 3D!

What will you print?

Technorati-címkék: