Category Archives: Cloud

Delete old document versions from OneDrive for Business

I’m using OneDrive included in my Office 365 subscription to store a copy of my local backup in the cloud. My subscription provides 1 TB cloud storage for every user, which is quite a decent amount of storage space, at least for my needs, so I was really surprised when I received the warning that my OneDrive is full. How can that happen, my backup data is only 0.5 TB locally, how can that consume twice as much space in OneDrive?

What takes up so much storage space?

I sync tons of data to OneDrive, so first I had to understand what actually consumes the most storage space. OneDrive by default does not show the size of folders, but here is the trick to view that:

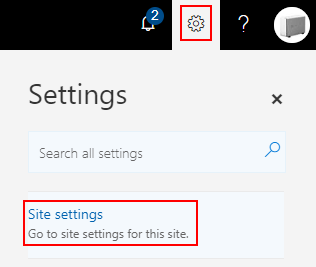
Click the Gear on the top right corner, than click Site settings on the sidebar:

Site-Settings-menu

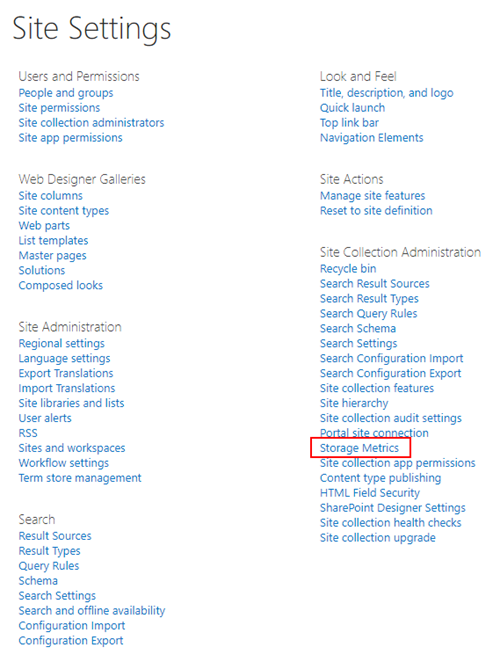
If you ever administered SharePoint, the list of menu items will be familiar to you: your OneDrive for Business storage is actually a SharePoint site collection. Click Storage Metrics in the right column:

Site-Settings

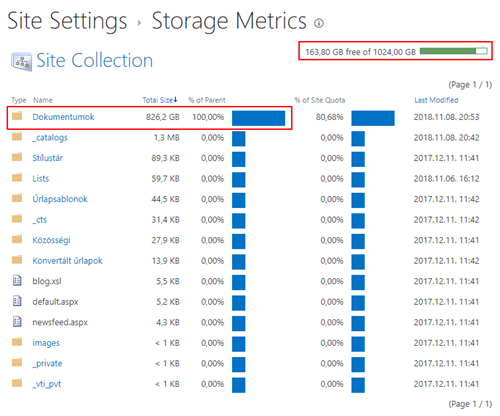
Here you can see all your files and even the system folders with a nice inline bar, so you can immediately see which folder consumes the most space. Actually all your data is in the Documents folder:

Storage-Metrics

By clicking the folder names you can dive deeper and see subfolders and files. Note that the Total Size includes the following:

  • Deleted files in Recycle Bin
  • All versions of the file
  • Metadata associated with the file

To check the versions you can click the Version History link on file level:

File-List

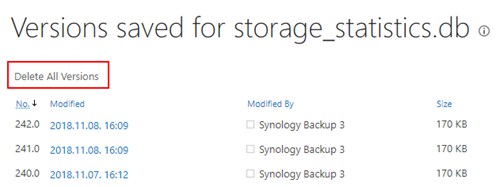
Here you can see that OneDrive for Business does have file versioning enabled by default, so when you overwrite a file, the previous version remains there and consumes storage space from your quota. By clicking the Delete All Versions link you can get rid of the old versions:

Delete-All-Versions

Unfortunately you have to do it file-by-file, there is no UI option to delete the old versions of all files from your subscription.

Recycle Bin

As a first step I wanted to check whether my Recycle Bin contains any files, because if it does, it counts into my quota.

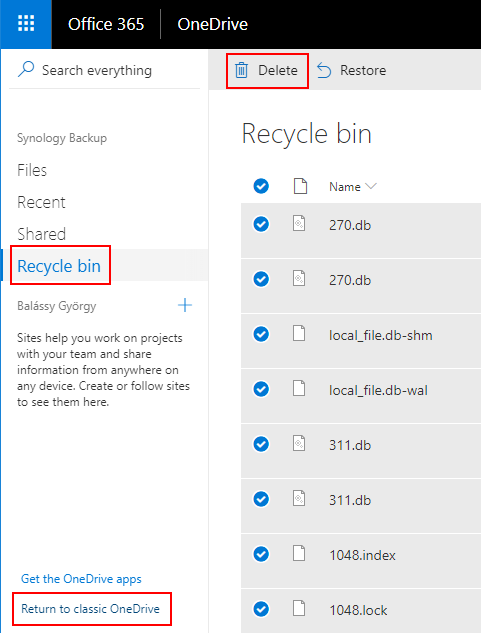
So I opened my OneDrive in the browser and clicked Recycle bin in the left menu:

OneDrive-Recycle-Bin

Unfortunately it does not show how big are those files in the Recycle Bin, but clicking Return to classic OneDrive in the bottom left corner you can get a different view, where you can sort the file by Size, and Empty the Recycle Bin with a single click:

Recycle-Bin-file-size-list


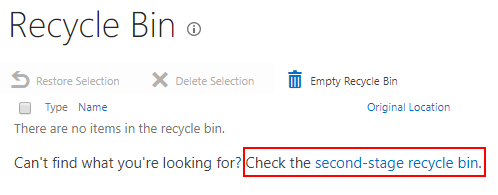
Do you think you are done? Not yet! Recycle bin is there to protect you from accidental file deletion, but there is a second-stage recycle bin to protect you against accidental recycle bin emptying:

Recycle-Bin-empty

So click the second-stage recycle bin link (which is actually the admin level recycle bin on the site collection) to see that your files are still there:

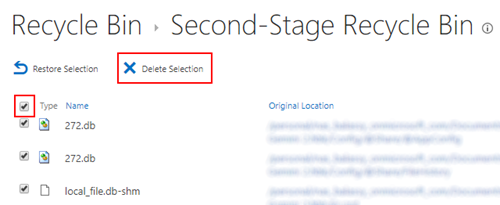
Second-Stage-Recycle-Bin

Click the checkbox at the top of the first column to select all files, then click Delete Selection. Bad news: the list is paged, and you have to do it page by page 😦

Disabling document versioning in OneDrive for Business

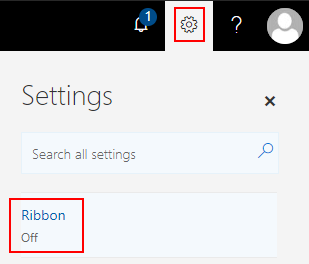
Because your OneDrive for Business is actually a SharePoint site collection, and all your files are in the Documents folder which is actually a SharePoint document library, you can disable versioning for all your documents by disabling versioning in that single document library. To find that configuration option first click Return to classic OneDrive in the bottom left corner, then the Gear on the top right corner, and then click Ribbon in the right sidebar to view the ribbon:

Enable-Ribbon

Expand the ribbon by clicking the Library tab, and then click Library Settings towards the right end of the ribbon:

RIbbon

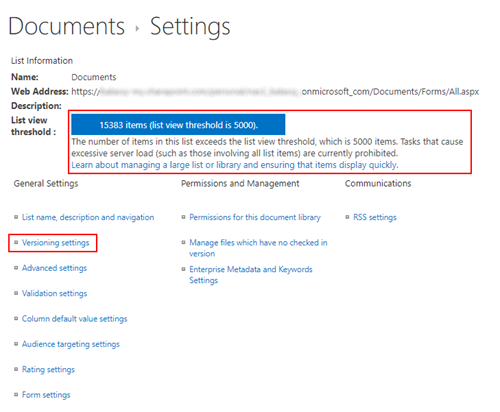
The settings page of the document library contains several useful option and information:

Documents-Settings

First, if you have more than 5000 files in your OneDrive (like I do), a List view threshold warning is shown on this page. This will be important later, because as the description says, you cannot do operations on that many files at once.

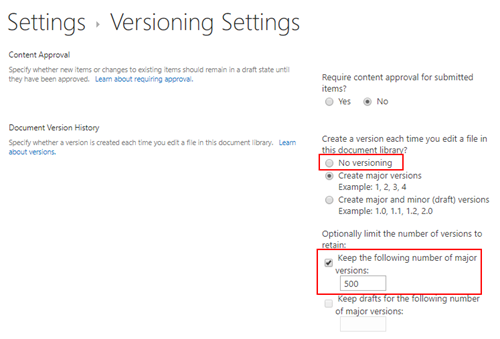
Second, the Versioning settings link leads to the page where you can disable versioning, or limit the number of versions retained:

Versioining-Settings

Both option can help you reduce the storage space needed for your files. Note however that turning off versioning here does not delete the existing versions of your files!

Delete old document versions of all files

Unfortunately there is no option on the UI to delete the old versions of all your documents with a single click, but thankfully SharePoint has an API, so you can do it programmatically.

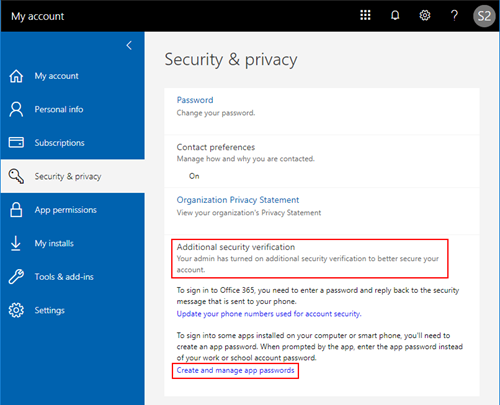
If you have multifactor authentication enabled (you do, right?) then the first step is to generate an application password. To do that click your avatar in the upper right corner, then click the My account link, or navigate directly to https://portal.office.com/account/.

On the left menu click Security & privacy, then on the middle pane click Additional security verification. It does not look like a menu item, but it actually is, and expands the pane to show new items:

Security-and-privacy

Click the Create and manage app passwords link and use that page to generate a unique password for your app.

The next step is to download the SharePoint Online SDK which installs a set of DLLs into the C:\Program Files\Common Files\microsoft shared\Web Server Extensions\16\ISAPI folder. You can use these DLLs with the PowerShell scripts published by Arleta Wanat to the TechNet Script Center:

These are very handy scripts, note however that they have a limitation: they cannot deal with more than 5000 files and you can receive the following exception:

“Microsoft.SharePoint.Client.ServerException: The attempted operation is prohibited because it exceeds the list view threshold enforced by the administrator.”

Thankfully CAML has the power to limit the number of returned items using RowLimit and add paging, however it does not always work if you want to run a recursive query. But the option to run a separate CAML query to each and every folder is working.

I implemented my final solution in a good old .NET console application using the SharePoint client-side object model. The application executes the following steps:

  1. Connects to your OneDrive for Business or SharePoint site collection.
  2. Finds the Documents document library.
  3. Iterates through the specified subfolder paths in the document library.
  4. It runs CAML queries in every folder to retrieve the documents (files). In a single query maximum 100 documents are retrieved, and the query is executed again and again until all documents are processed.
  5. If a document has multiple versions, they are deleted.

You can find the code in Github and customize it according to your needs: https://github.com/balassy/OneDriveVersionCleaner
 

Technorati-címkék: ,,,

IP filtering in IIS running in the Amazon cloud

You can setup highly scalable webservices very easily in the Amazon EC2 cloud: just create two new virtual machines, connect them to a load balancer and you’re done! The dark clouds will begin to gather over your head, when you realize that the carefully setup IP filtering does not work in IIS, and anyone can access your website.

The problem is that the IIS running in the virtual machine sees the load balancer as the client, and not the original browser. (Obviously, IP filtering would work perfectly for that internal address, but I’m pretty sure you don’t need that.) If you don’t believe me, check your IIS log files.

Thankfully Amazon load balancers support the Proxy protocol which forwards the IP address of the real client in the X-Forwarded-For HTTP request header. By default IIS doesn’t log the value of this field, but you can add it to your logs with a few clicks:

iis-proxy-logging

The second good news is that you can configure IIS to use the X-Forwarded-For header for IP filtering. In IIS 7 you can do this with the Dynamic IP Restriction module, and from IIS 8 you can get this functionality built into the IP Address and Domain Restrictions module. It is not enabled by default, but you can activate it with a single click:

iis-proxy-mode


Technorati-címkék: ,,

Visual Studio editions

The recently announced Visual Studio Online (formerly Team Foundation Service) extended the Visual Studio offering with three new editions. This is the complete list now (excluding the Express editions):

Comparison tables:

You can find detailed information and the FAQ about licensing in the 34-page Visual Studio and MSDN Licensing White Paper, which was also updated in this month.


Technorati-címkék: ,,

Publishing a multiproject solution to Azure

One of the great features of the Windows Azure Websites is that you can directly connect the site to your source control repository. When you change your source code, it will be automatically deployed to the Azure cloud.

It is only a few clicks to set it up, just start the New –> Compute –> Web Site –> Custom create wizard:

multisite-new

Enter a URL for your website and don’t forget to check the Publish from source control checkbox:

multisite-name

This activates the second step of the wizard where you can select your preferred source control provider, for example GitHub:

multisite-where

In case of GitHub you have to authenticate yourself via OAuth, then you can select which repository and which branch you want to publish (master is the default, but you can change that to any branch name!):

multisite-repo

Within a few seconds your website will be up and running, and Azure will start deploying your application to it.

But what if you have a Visual Studio solution which contains multiple web projects or websites, which one will be deployed? The first one.

Well, that’s great for most cases, but sometimes you want to change that behavior.

If you always want to deploy the same project/site to the cloud, you can create a .deployment file in the root of your repo, in which you define which project you want to deploy:

[config]
project = MySolution/MyWebProject.csproj

But if you have multiple Azure websites, you may want to deploy different projects of your solution to them. In this case you cannot hardwire the setting into the repo, instead you have to set on the Azure management portal. Navigate to the CONFIGURE page and scroll down to the app settings section. Create a new setting with the name Project and set the repo-root relative path to the .csproj or the folder of the website as its value:

multisite-appsettings

Just save the setting and voila, next time when you change your source code only the preset project will be deployed to this website.


Technorati-címkék: ,,,

Launching Lync Web App instead of the Lync client

Sometimes happens that you receive a Lync meeting request, but when you click on the meeting URL the Lync client cannot join the external SIP domain. In these cases the simplest solution would be to launch the Lync Web App, however it won’t start in the browser if you have the Lync client installed.

The quick solution is to append ?sl=1 to the end of the meeting URL.

For example: https://FQDN/organizerID/meetingID?sl=1

You can read more about the internal launch logic of the Lync Web App: Launching Lync Web App.

I am not sure that this is a best practice to follow in 2013.


Technorati-címkék: ,

tfspreview.com

The Team Foundation Server has a cloud-based (of course it runs on Azure), subscription-based version, called Team Foundation Service. Because this service is currently in preview, you can register for free on http://tfspreview.com. For this price you got not only a source control, but all the nice features of TFS.

tfspreview

I use this service since the first internal preview release, and I really like it. It takes no time to start my browser and create a brand new team project, and in 1 minute it’s ready and you can connect to it. I use it even for 1-person projects, because I believe in this online service more than an SVN installed onto my own computer. So I think the message below is quite correct. Mosolygó arc

love this


MS Days 2012 Bulgaria

MS Days 2012 BulgariaThanks for joining us in Sofia at the Microsoft Days 2012 conference!

You can download the presentations and the demos for both sessions:

Feedback and comments are more than welcome, and we would really appreciate if you would tell us how you liked our sessions. Just leave a comment here or send us an e-mail!

Thanks,

György Balássy and Zoltán Dávid


How to deploy a Visual Studio Database project to SQL Azure

The Database project type in Visual Studio is a perfect tool for managing database objects and master data records. However, due to chronological reasons, the Database project does not have out-of-the-box support for SQL Azure, so you cannot directly deploy your database to the cloud. This video is a step by step tutorial that guides you through a workaround for deploying a Visual Studio 2010 Database project to SQL Azure.

The video is hi-res, so 720p and full screen view is recommended.


Technorati-címkék: ,,